Tuesday, October 13, 2009

Dr. McBreakfast...Or How I Fell in Love With A Sandwich

To begin, in the past we have stated that this blog is not for certain things (boiling water, putting chicken on cookie sheets, telling time, etc), but probably have not been clear what it is in fact for. This post is to bring my disdain for the fast food "restaurant" Jack in the Box and their fearless yet narcissistic leader simply known as Jack. Just about everything in his "restaurant" bears his name except for his breakfast sandwich, especially the "ultimate breakfast sandwich." If that is not the sweet sound of defeat, I don't know what is. From what I can tell, since Jack was a young boy he knew that his "ultimate breakfast sandwich" would be bested and decided to keep his name off it. You chose wisely fast food magnate, because you have. Been. Bested that is. I give you the Ultimate Breakfast Sandwich or as I call it, "EL ULTIMO SANDWICH DEL DESAYUNO."

The ingredients for the USDD can be found at any grocery store and you do not need to go to any of the fancy ones around town. That said, I wish I had gone to Jimmy's Food Store to purchase some of the below items.


Look, this is going to be a quick pictorial of sorts and I am going to assume you the beloved reader knows their way around a skillet and knows that when stuff starts smoking, you need to take it off of the heat. I did not and ruined 3 pieces of bacon.


Also, it should be noted that there are probably a couple of steps in here that can be interchanged, I happened to do it this way since I don't have a lot of burners that work and had to make do. Start frying up the bacon and a couple sausage patties.


Cut up some tomatoes and put them in whatever device you plan on mixing your eggs in and mix it up. Tomatoes are key because they are the one single healthy item in this cornucopia of grease, fat and generally bad for a human delicacies.


Make a hamburger patty and add a liberal amount of salt and pepper. Okaaaaaaaay.


Again, this blog is not for scrambling eggs, but this is the beginning of eggs being scrambled. Note the tomatoes. There they are.


Cook up a hamburger patty in the same pan as the bacon and sausage from earlier. At the same time cut open the package of hot dogs and carefully wrap two in a paper towel and microwave them for however long it tells you to on the package.


This is what you should have when you are done cooking everything:


Assembly:
One slice of Cojack cheese on one side and grated Mexican cheese on the other.


Alright, shoot. I forgot to say there was ham involved. This blog is for telling you how to cook ham in the kitchen. Throw it in a pan and let it cook until you think its done. There.
Add a slice of ham to each side of the bun.


Add an even amount of bacon and sausage to each side.


Cut hot dogs in half and add them to the rest of the stuff.


Now, this is the absolute most important least important part of the process. Eggs on the inside hamburger on the inside. Separate sides.


It should be noted, I used a roll that I found in a bag that I bought at the grocer. You will see it in a minute. Like a good cheeseburger sometimes the roll/bread substance you use really brings out the taste. The USDD could have really used a couple of things to enhance the flavor. Hot sauce is the biggest of these things and I consider this a huge failure on my part, but I got so giddy with excitement as the cheese started to melt and this monstrosity was staring at me that I had to dig in. That said, I only had half. Trying to loose some LB's. I can hear the internet buzzing with excitement so,

THE USDD:


Was it good? By no means was it good. Was it bad, no. Will I make this again, probably not. Will I eventually attempt something similar but take more time with it and not try to throw a bunch of S together in a sandwich at noon on a Saturday, yes. This USDD was a creation of boredom and should not be attempted by those that have things to do on Saturdays. Ok, thats all I have to say on the USDD. Tell your friendsnotfriends.


Other things. If you like comedy, you really need to check out Patton Oswalt's latest album "My Weakness is Strong." Also, Iron and Wine's latest album The Shepherd's Dog has been getting a lot of play lately because of the cold weather. It is good.


~El Smokeador~

Bookmark and Share

Thursday, October 1, 2009

Sandwich Quest One Million


Every once in a while, we all have to take a journey. For whatever reason, we must quest against the darkness to find the PRIZE. For instance, Gary Patterson from time to time quests against his shoe laces. Everyone knows who wins this battle.

For me, the last couple of weeks has been one of those times. For reasons I don't believe I'll ever fully understand I decided to make a homemade Reuben sandwich, and I do very much mean "homemade". The quest took three weeks and involved many co-adventurers, including Steph-Smoke and L-Smoke. And yes, we attained the Prize.

You may be saying "3 weeks!? Why!?" Well I knew you'd say that, and I'm more than prepared to explain myself via web log. So here's the deal. A traditional Reuben is heated pastrami, on rye bread, served with Swiss cheese Russian/Thousand Island dressing and sauerkraut. It takes roughly three weeks to make all of these things. (we did not make all of them)

The first step....make Corned Beef. (This step takes 3 weeks. So get ready.) Pretty much corned beef is brisket which has been "cured". By curing I mean packed in salt and spices and left in a cold place for weeks. You can cure with a super salty brine as well, but I did not do that. I did the former. The reasons it is called "corned" is because the salt pellets used in the olden times were roughly the size of a kernel of corn. We all learn something new everyday.

CORNED BEEF:


Step 1: Break a Light Bulb


(you just got to)


Step 2: Get a Brisket.
Step 3:Get a lot of salt, mix in a bay leaf, cracked pepper, allspice, juniper, paprika, and what have you, preferably from Pendrey's, put in a bowl for a beautiful picture.

Step 4: Trim the Fat from the Brisket

Step 5: Pack the Salt and spices into the Brisket and put into Zip-Lock


Step 6: Put in Oven tray and weight down with something heavy, I used flour and some cans. Put in the fridge and flip once a day.

Step 7: Wait 3 weeks.


Step8: Uncover, get out of zip lock, and wash thoroughly.


Step 9: Rinse and set aside (no picture) This blog is not about setting things aside.

And that's, that! Tadaa, you got corned beef there fella.

PASTRAMI:

Ok, so the next step is to make Pastrami. And as we all know, (I didnt know this) Pastrami is smoked corned beef. And we're off....

Step 10: Fire up the Smoker:


Step 11: Spice up the meat. I bought some new chili's! Fruity and spicey and great. Just a dash.

I blended up the pepeprs, and lots of black pepper for a mild Pastrami rub.

Rub the meat well, add some Kosher salt and put on the smoker at 225.

I don't know if this was traditional or not, but I just smoked it like any other old brisket. See pretty much every other post on this blog for information on how to smoke a brisket. This blog is about smoking briskets and such.

Step 12: Remove from foil, let rest and slice! Boom! You got Pastrami.


RYE BREAD:

Ok, so the next step is to make rye bread with lots of fennel and caraway seeds. To tell you the truth, making rye bread is a hell of a process and takes a lot of steps. Generally speaking, we used all of the ingredients shown below, jump started the yeast, slowly added rye and bread flower, kneaded until lots of gluten had formed... we let it rise, we pushed it down etc etc etc, and we baked it. If you want a better recipe check out www.google.com, I hear it s great. Anyway, I'm going to let the pictures and videos speak for themselves for this process.


And Boom Goes the Dynamite, you got Rye Bread.

THOUSAND ISLAND DRESSING:

Ok so thousand island dressing is mayo and ketchup mixed with crunchy delicious vegetables and such.

Step 78:Make Mayo (see Oyster Po' Boy post for directions)


Step 83: Add chopped capers, green onions, delicious pickles, and random herbage. Mix with ketchup and and put it jar.


SWISS CHEESE:

Step 56: Milk a standard Texas Dairy Cow


Step 65: Just Kidding, I bought the cheese at Central Market.


SAUERKRAUT:

No Steps. Just Buy it. (which is a little sad because I bet its not that hard to make) Anyway I bought it.


ASSEMBLY:


Finally, after weeks of prep we were ready for assembly. We cut the Rye as thin as we could, and buttered it and placed in a cast iron skillet. At the same time we slowly heated our pastrami, (which was still warm from the smoker) and heated the sauerkraut in another pan. When all was hot we added the items thusley:


And the final sandwich turn out like this:


Here is what the sandwich tasted like:


VICTORY! (that's at Clemson by the way)

Anyway, the sandwiches were delicious, and I'd like to thank Lsmoke and Stephsmoke for all of their help. I feel like I've made some glorious accomplishment. Perhaps, they'll let me in to the Sandwich Championship Series (SCS). Probably not. F**king Boise State.

Thanks for reading everyone. More to come soon.

-Smokehopper

Some have asked if it was worth it?

For the learning experience and fun I had while doing all of this, of course it was worth it. Every cooking venture which is a little bit above your level is always worth it. It was a lot of fun as well. Was it the best reuben I've ever had...no. I've had better before, mainly because at a deli, the pastrami is cut with a meat slicer. Smoked corned beef is tough stuff and there is a reason it is cut so thin. Our pastrami was a little chewy but not terribly so. the end.

Bookmark and Share

Wednesday, September 2, 2009

Oh Hatch Chile's

You bring me joy.


It is Hatch Chile season. Last night was my first foray into the greatness of the Hatch and I must say I am ashamed that I was not told about this neat little green pepper earlier. I have read about them for a couple years and did my studies (on my own time, MY OWN TIME) to figure out the proper way to cook these big little guys. This post might have a lot of consecutive contradictions. (This blog is not necessarily all about grammar). Here we go.

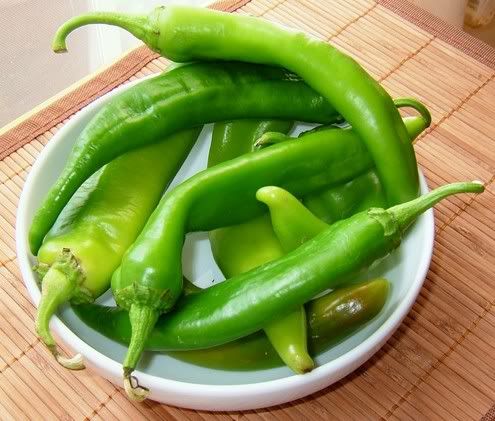
Do not confuse these peppers with Anaheim peppers like Smokehopper used in his Ranchburgers a couple posts back. The store last night had them right next to the Anaheims and a smart notsosmart Smokeador would have grabbed them. Luckily I am a smarter Smokeador. This is what they look like:
(Not my pic. Don't tell the site I took it from.)

It's imperative that you roast these bad boys on an open flame until you get a nice black char on the skin. I didn't take pics of the roasting process because I wasn't sure that this was going on the blogosphere. BUT, after you get a good char going put them in a big ziplock and immediately put them in the fridge so they can sweat. This really makes it easier to get the skin off (thanks Shag) and saves some time peeling.

(In the bag after the fridge)

It should be noted at this point that Smokehopper told me that I needed to take the seeds out. I didn't take the seed out and it ended up being kind of spicy and delicious. Next batch seeds will be removed and we will see what I like better. Probably going to be no seeds, but again, first foray into the Hatch Chile.
(Peeled and sliced for the blender)

I roasted about 6 last night and only used 4 for this chicken. Saved 2 for my eggs this morning and they were glorious. Anyway, after they were peeled I threw them in the blender with some olive oil and tried to blend it up into a nice paste. Long story short, I didn't have enough in there for it to blend properly and I ended up with mostly more chopped not chopped peppers in the blender. Poured them back on a cutting board and went to town with a large knife.

Had a nice bowl of fresh crushed peppercorns and crushed pink Hawaiian sea salt and mixed it all up into a nice salsa'y, pasty kind of substance.

(Peppers on top of salt and pepper)

(Mixed up real good not good)*

I had three chicken breasts that I halved and put on foil on a cookie sheet. This blog should not be about putting chicken on cookie sheets but I just made it that way. So it is now I guess. More to come on that.
(Salsa'y substance applied to chicken)

Left it alone in the oven for 45 minutes on 350 and checked periodically. Ovens. I know. I am not impressed either.

Finshed product:
(Still on said cookie sheet)


(With a salad too because we all need our greens)

All said, this was a fantastic meal. I can't wait to dive in feet first into more uses for these awesome peppers. I have been experimenting with different kinds of chicken in the oven lately. Made a chipotle meco pepper baste a couple weeks ago that was fantastic as well. It is probably reasonably but not very ideal to make lots of chicken in the oven with various types of stuff on top of it. I still have a few of these peppers left and will probably buy more to maybe dry out for a brisket rub later in the year. I don't know if we'll have enough time. Anyway, it was good and you should all head to Pendery's to get some spices, and New Mexico for some Hatch Chile's and make some stuff. Good, old fashioned stuff.

Here are some tunes you need to check out too.

The Very Best - Warm Heart of Africa
The Avett Brothers - Incomplete and Insecure
The Avett Brothers - The Perfect Space
Throw Me the Statue - Hi-Fi Goon
Girls - Hellhole Ratrace
Panda Bear - Bros
Edward Sharpe and the Magnetic Zero's - Home
Edward Sharpe and the Magnetic Zero's - Janglin
Patton Oswalt - Rats
Eels - That Look You Gave That Guy
and
All of Phoenix's "Wolfgang Amadeus Phoenix" Its great.

~El Smokeador~

*Real good not good is henceforth a copyrighted term to only be used by El Smokeador y Smokehopper.

Bookmark and Share